Better Payment now ships with a built-in MCP (Model Context Protocol) server. Turn it on, and you can run your payments and fundraising campaigns from Claude, ChatGPT, Cursor or any other MCP-compatible AI assistant, using plain language and without leaving the chat.
Once connected, you can ask your assistant things like “How much did we raise last month?” or “Create a draft campaign for our winter food drive with a $5,000 goal”. The assistant reads your Better Payment data or makes the change for you.
The MCP server is off by default. It stays off until you switch it on, and only WordPress administrators can connect a client.
This guide takes about 5 minutes and covers three things:
- Turn MCP on in Better Payment and save.
- Copy the server URL. One URL works for every client.
- Approve the client in Claude, ChatGPT or Cursor and confirm the connection.
Before You Begin #
Make sure you have:
- Better Payment installed and activated on your WordPress site, updated to the version that includes the MCP Server.
- An Administrator account on the site. Only administrators can enable MCP and approve clients.
- Your site running on HTTPS. Claude and ChatGPT only connect to servers with a secure connection.
- An AI client that supports remote MCP servers, such as Claude (web or desktop), Claude Code, ChatGPT, Cursor, VS Code or Windsurf. In Claude, adding a custom connector depends on your plan.
Step 1: Open the MCP Server Settings #
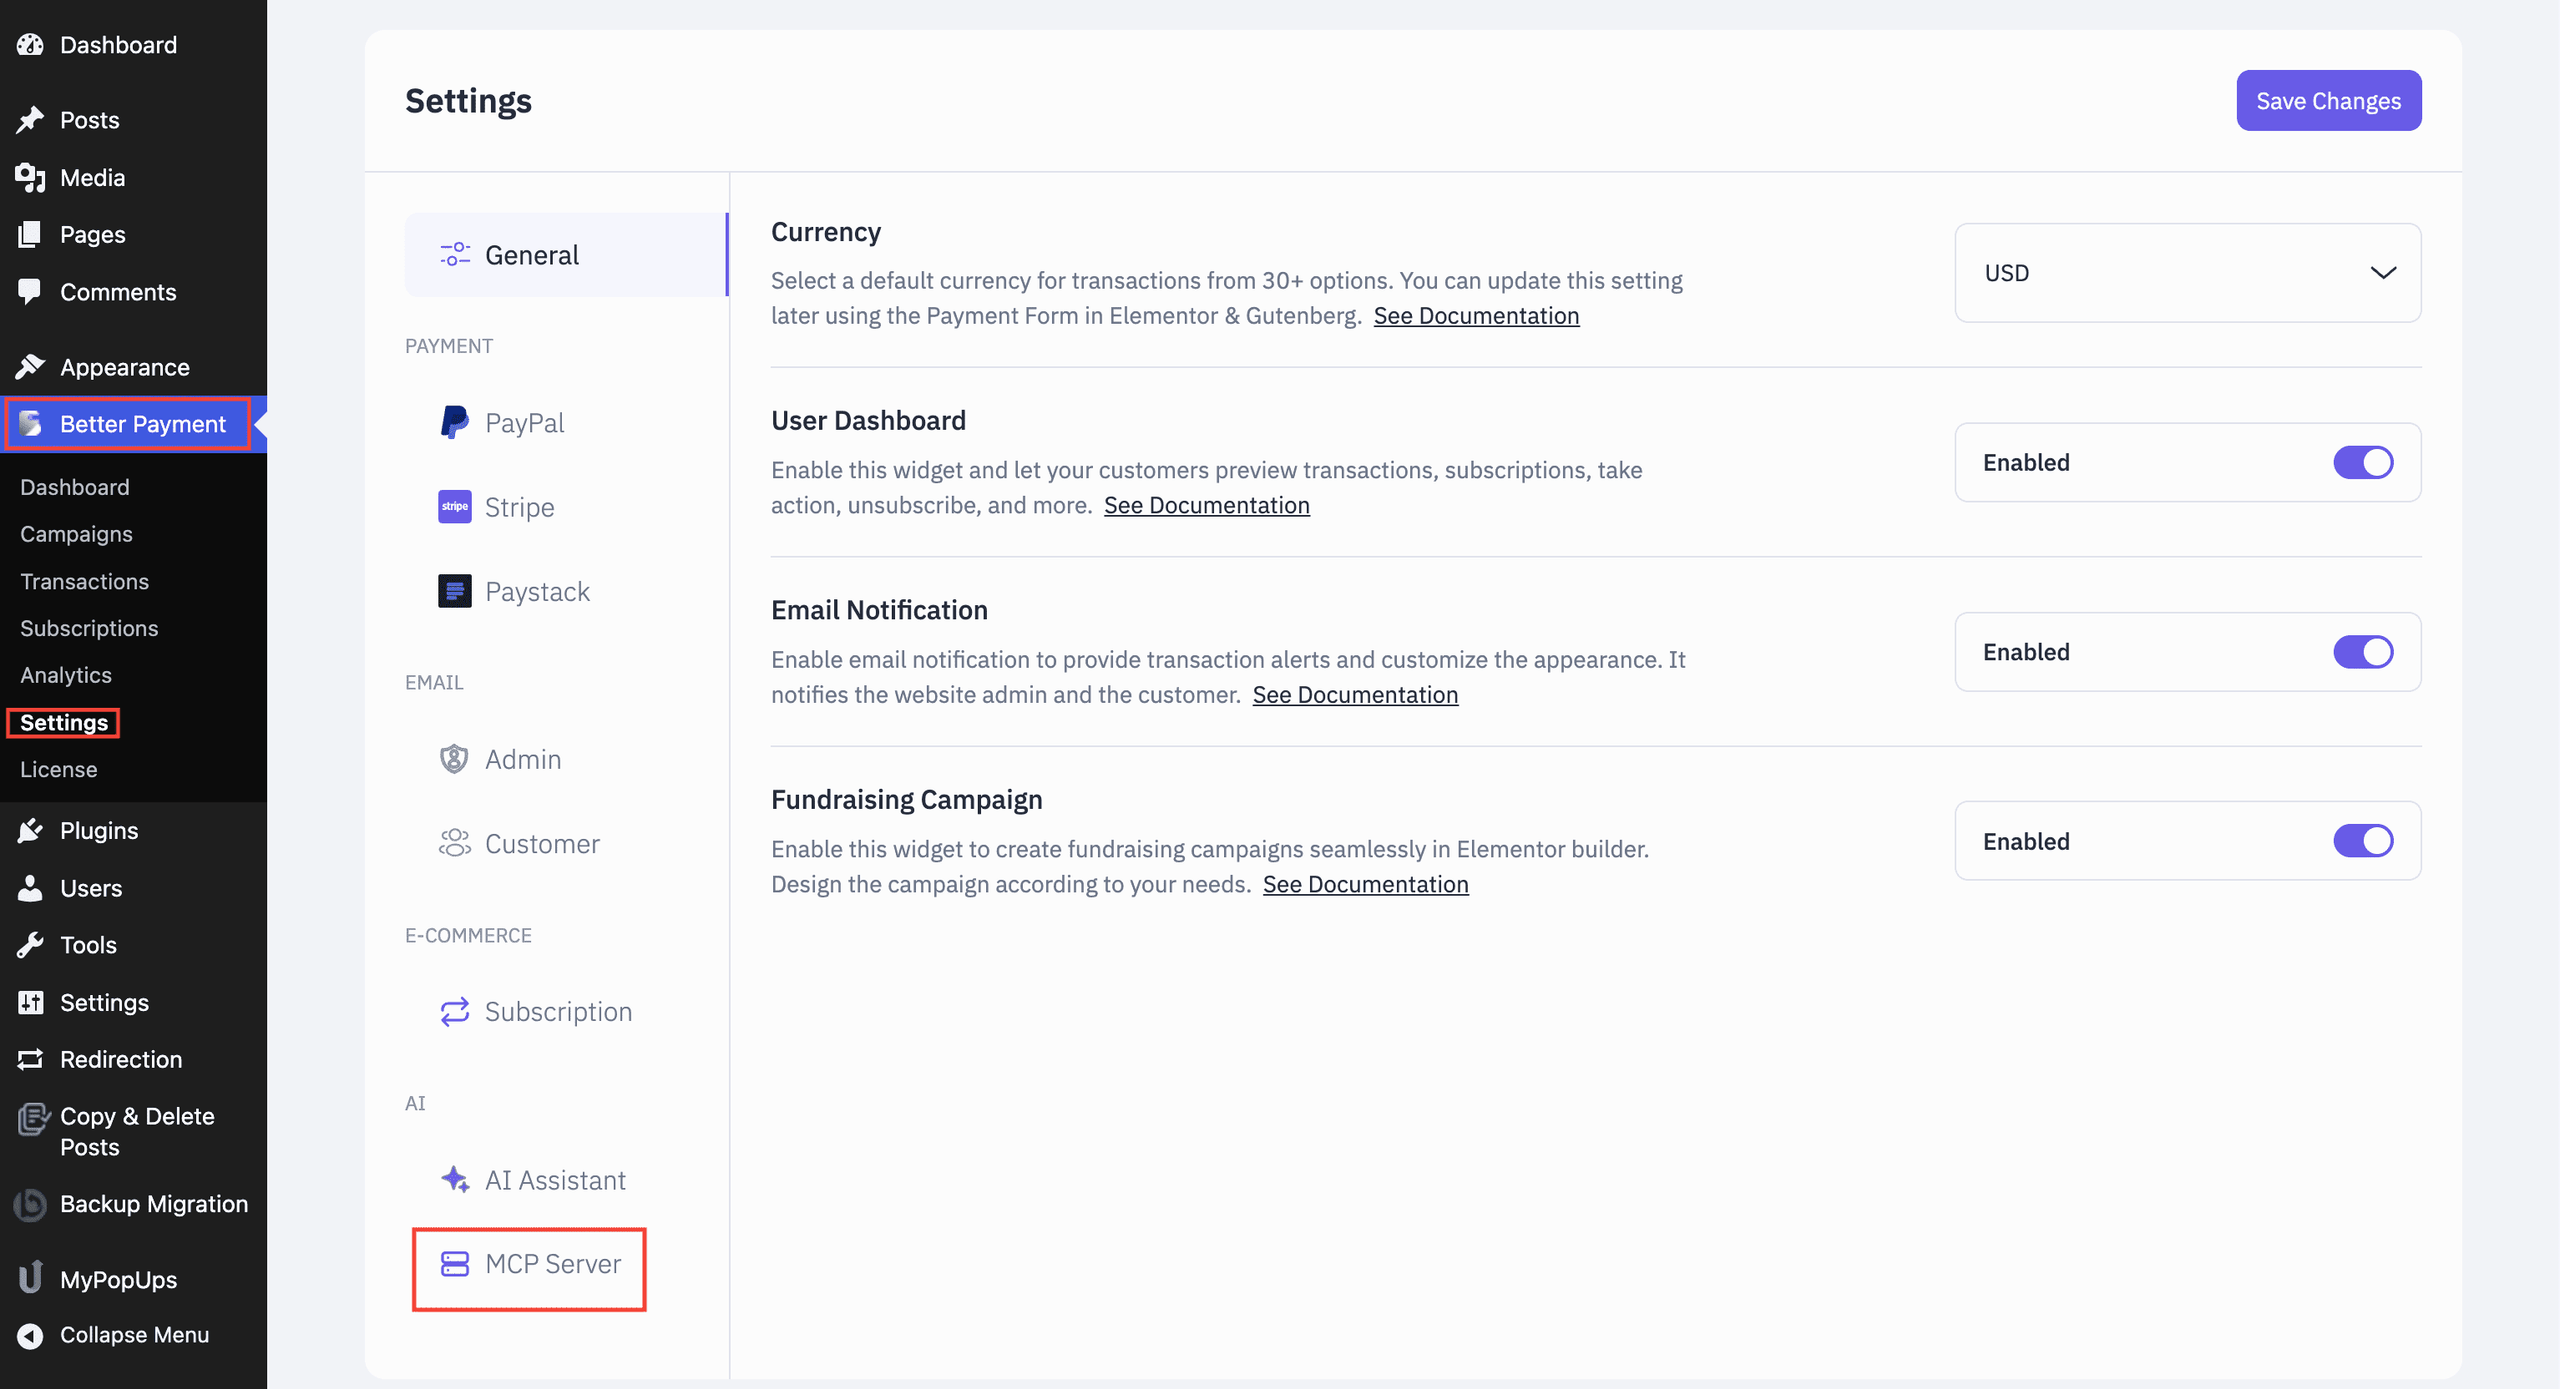
In your WordPress dashboard, go to Better Payment → Settings. In the left-hand settings menu, scroll to the AI section and click MCP Server.
Step 2: Enable MCP Access #
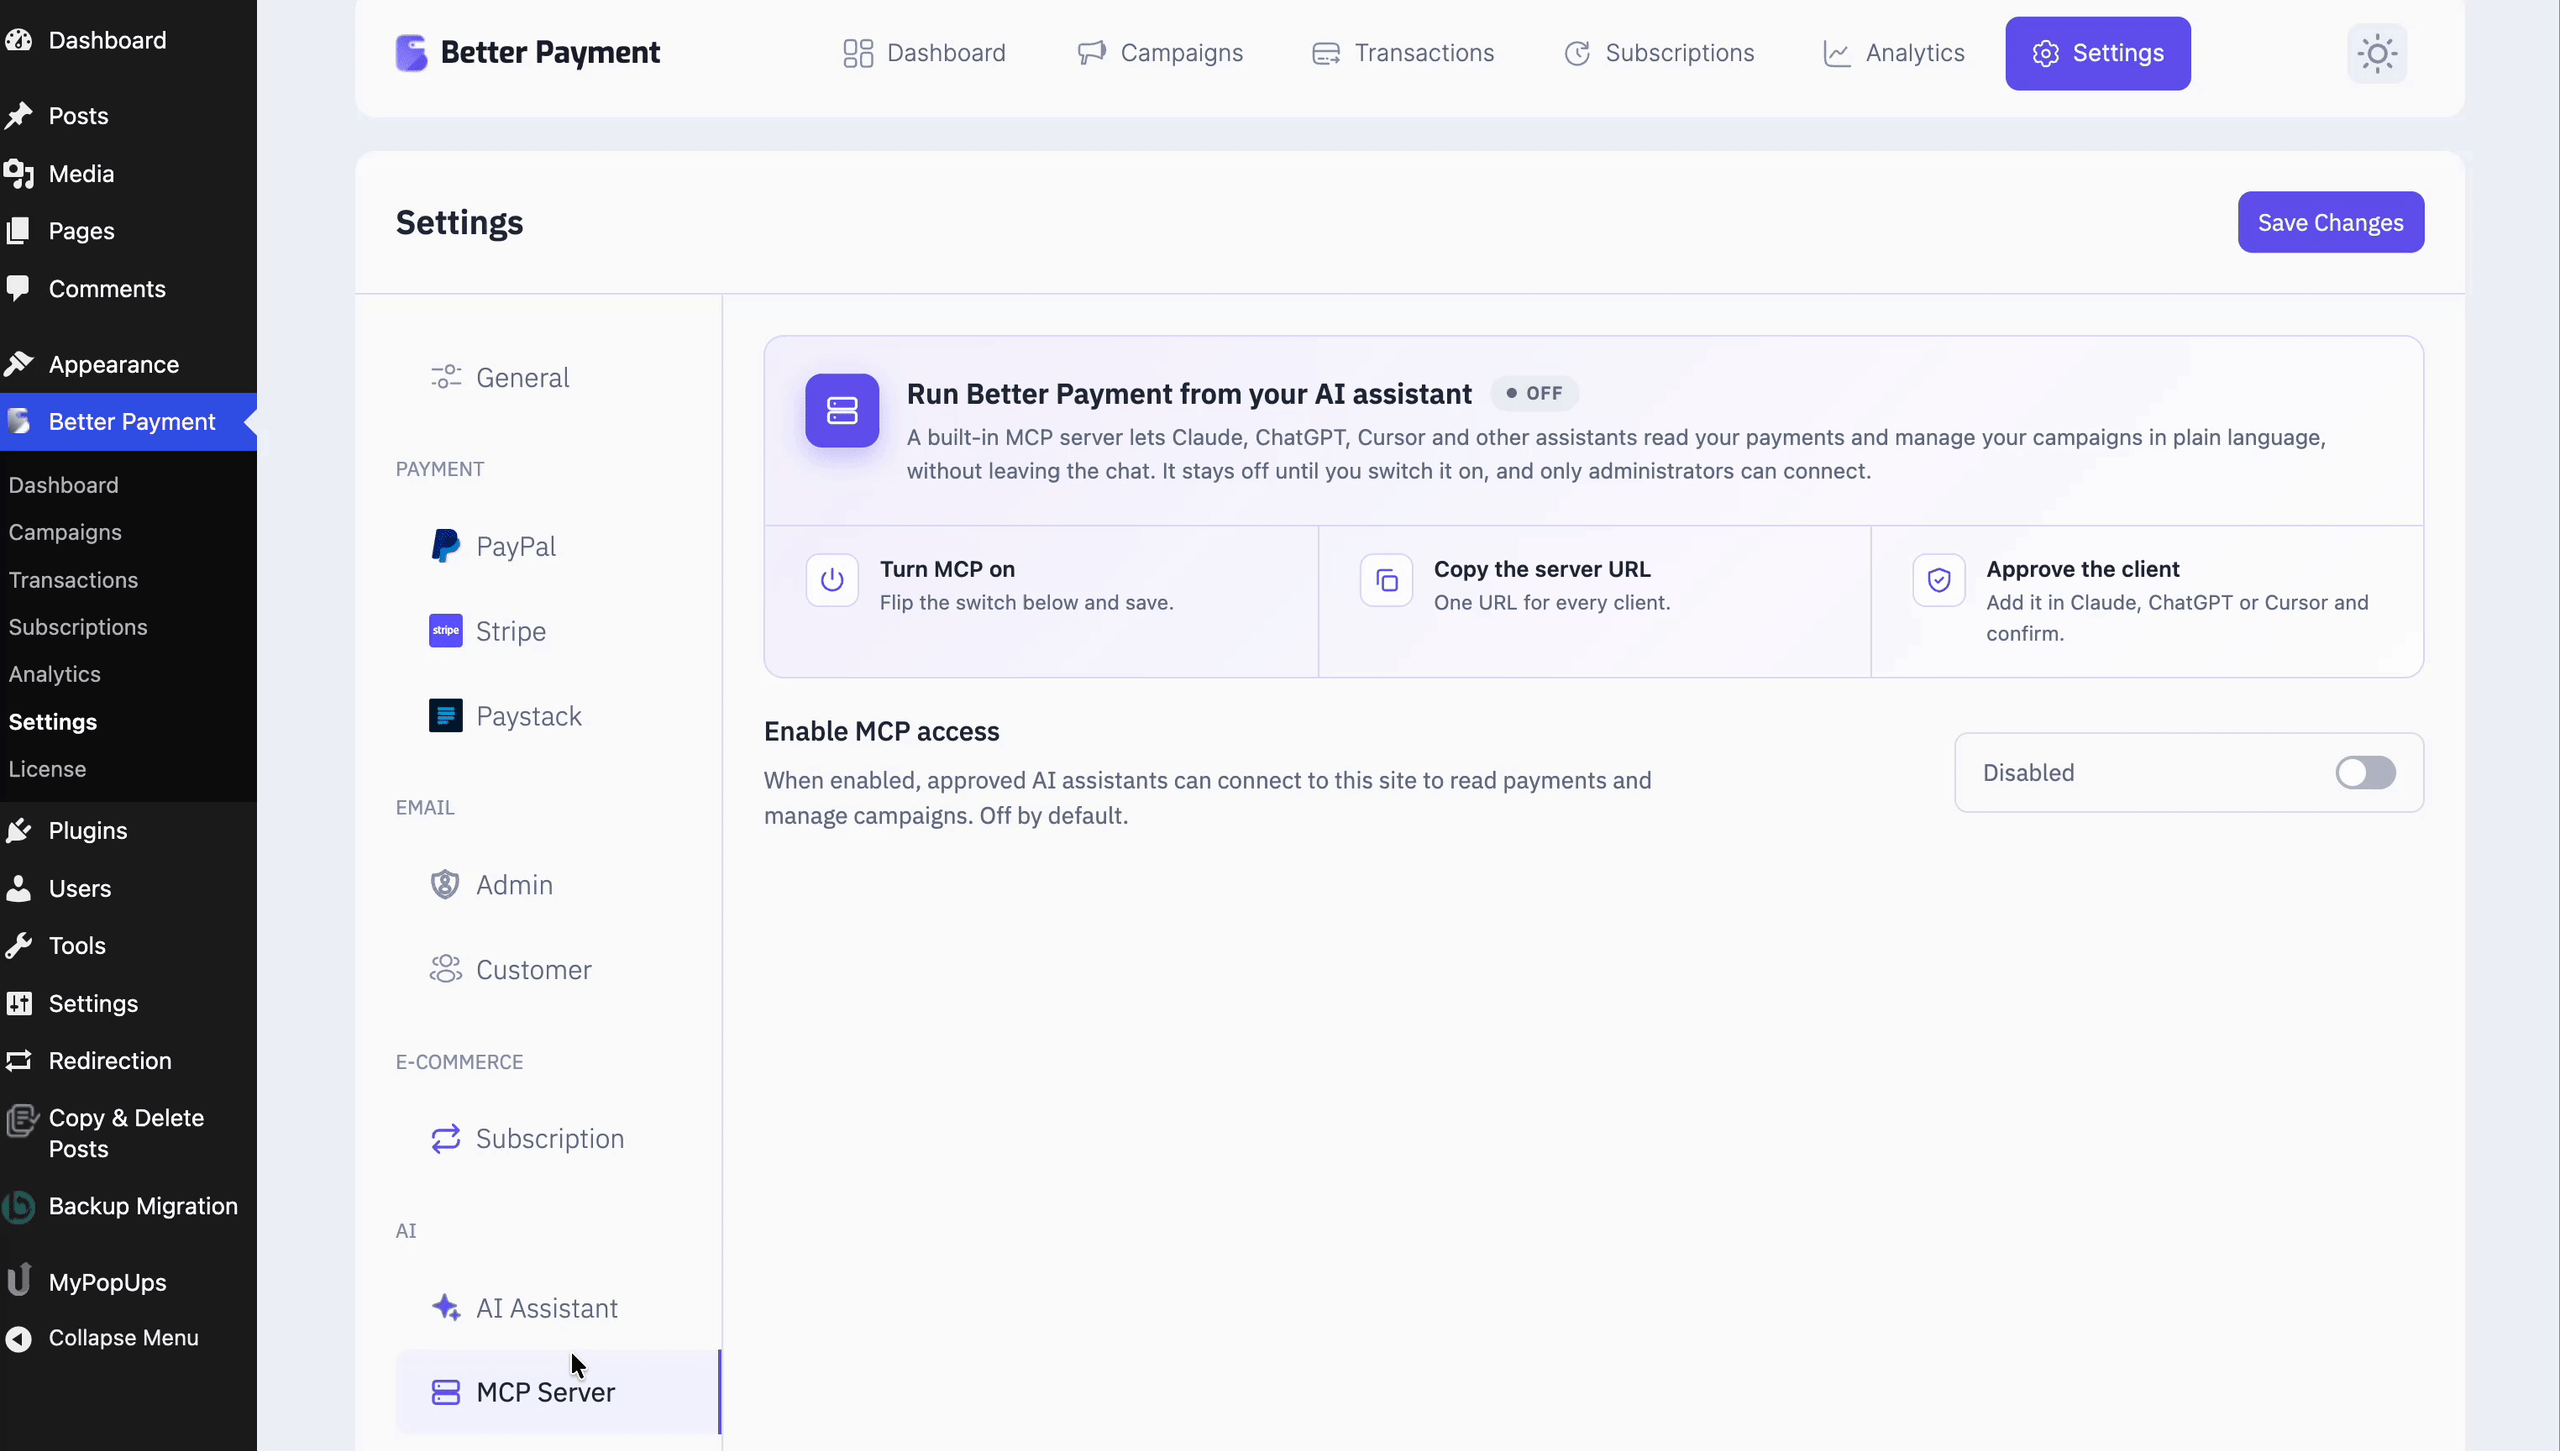
At the top of the MCP Server tab you will see the Run Better Payment from your AI assistant panel. Its status badge reads OFF until you turn it on.
- Find Enable MCP access and switch the toggle to Enabled.
- The badge changes to NOT SAVED, and the Connection settings appear below.
- Click Save Changes in the top-right corner.
The usage stats, the Connected applications list and the connection test only appear after you save.
Step 3: Copy the Server URL & Choose How Clients Sign In #
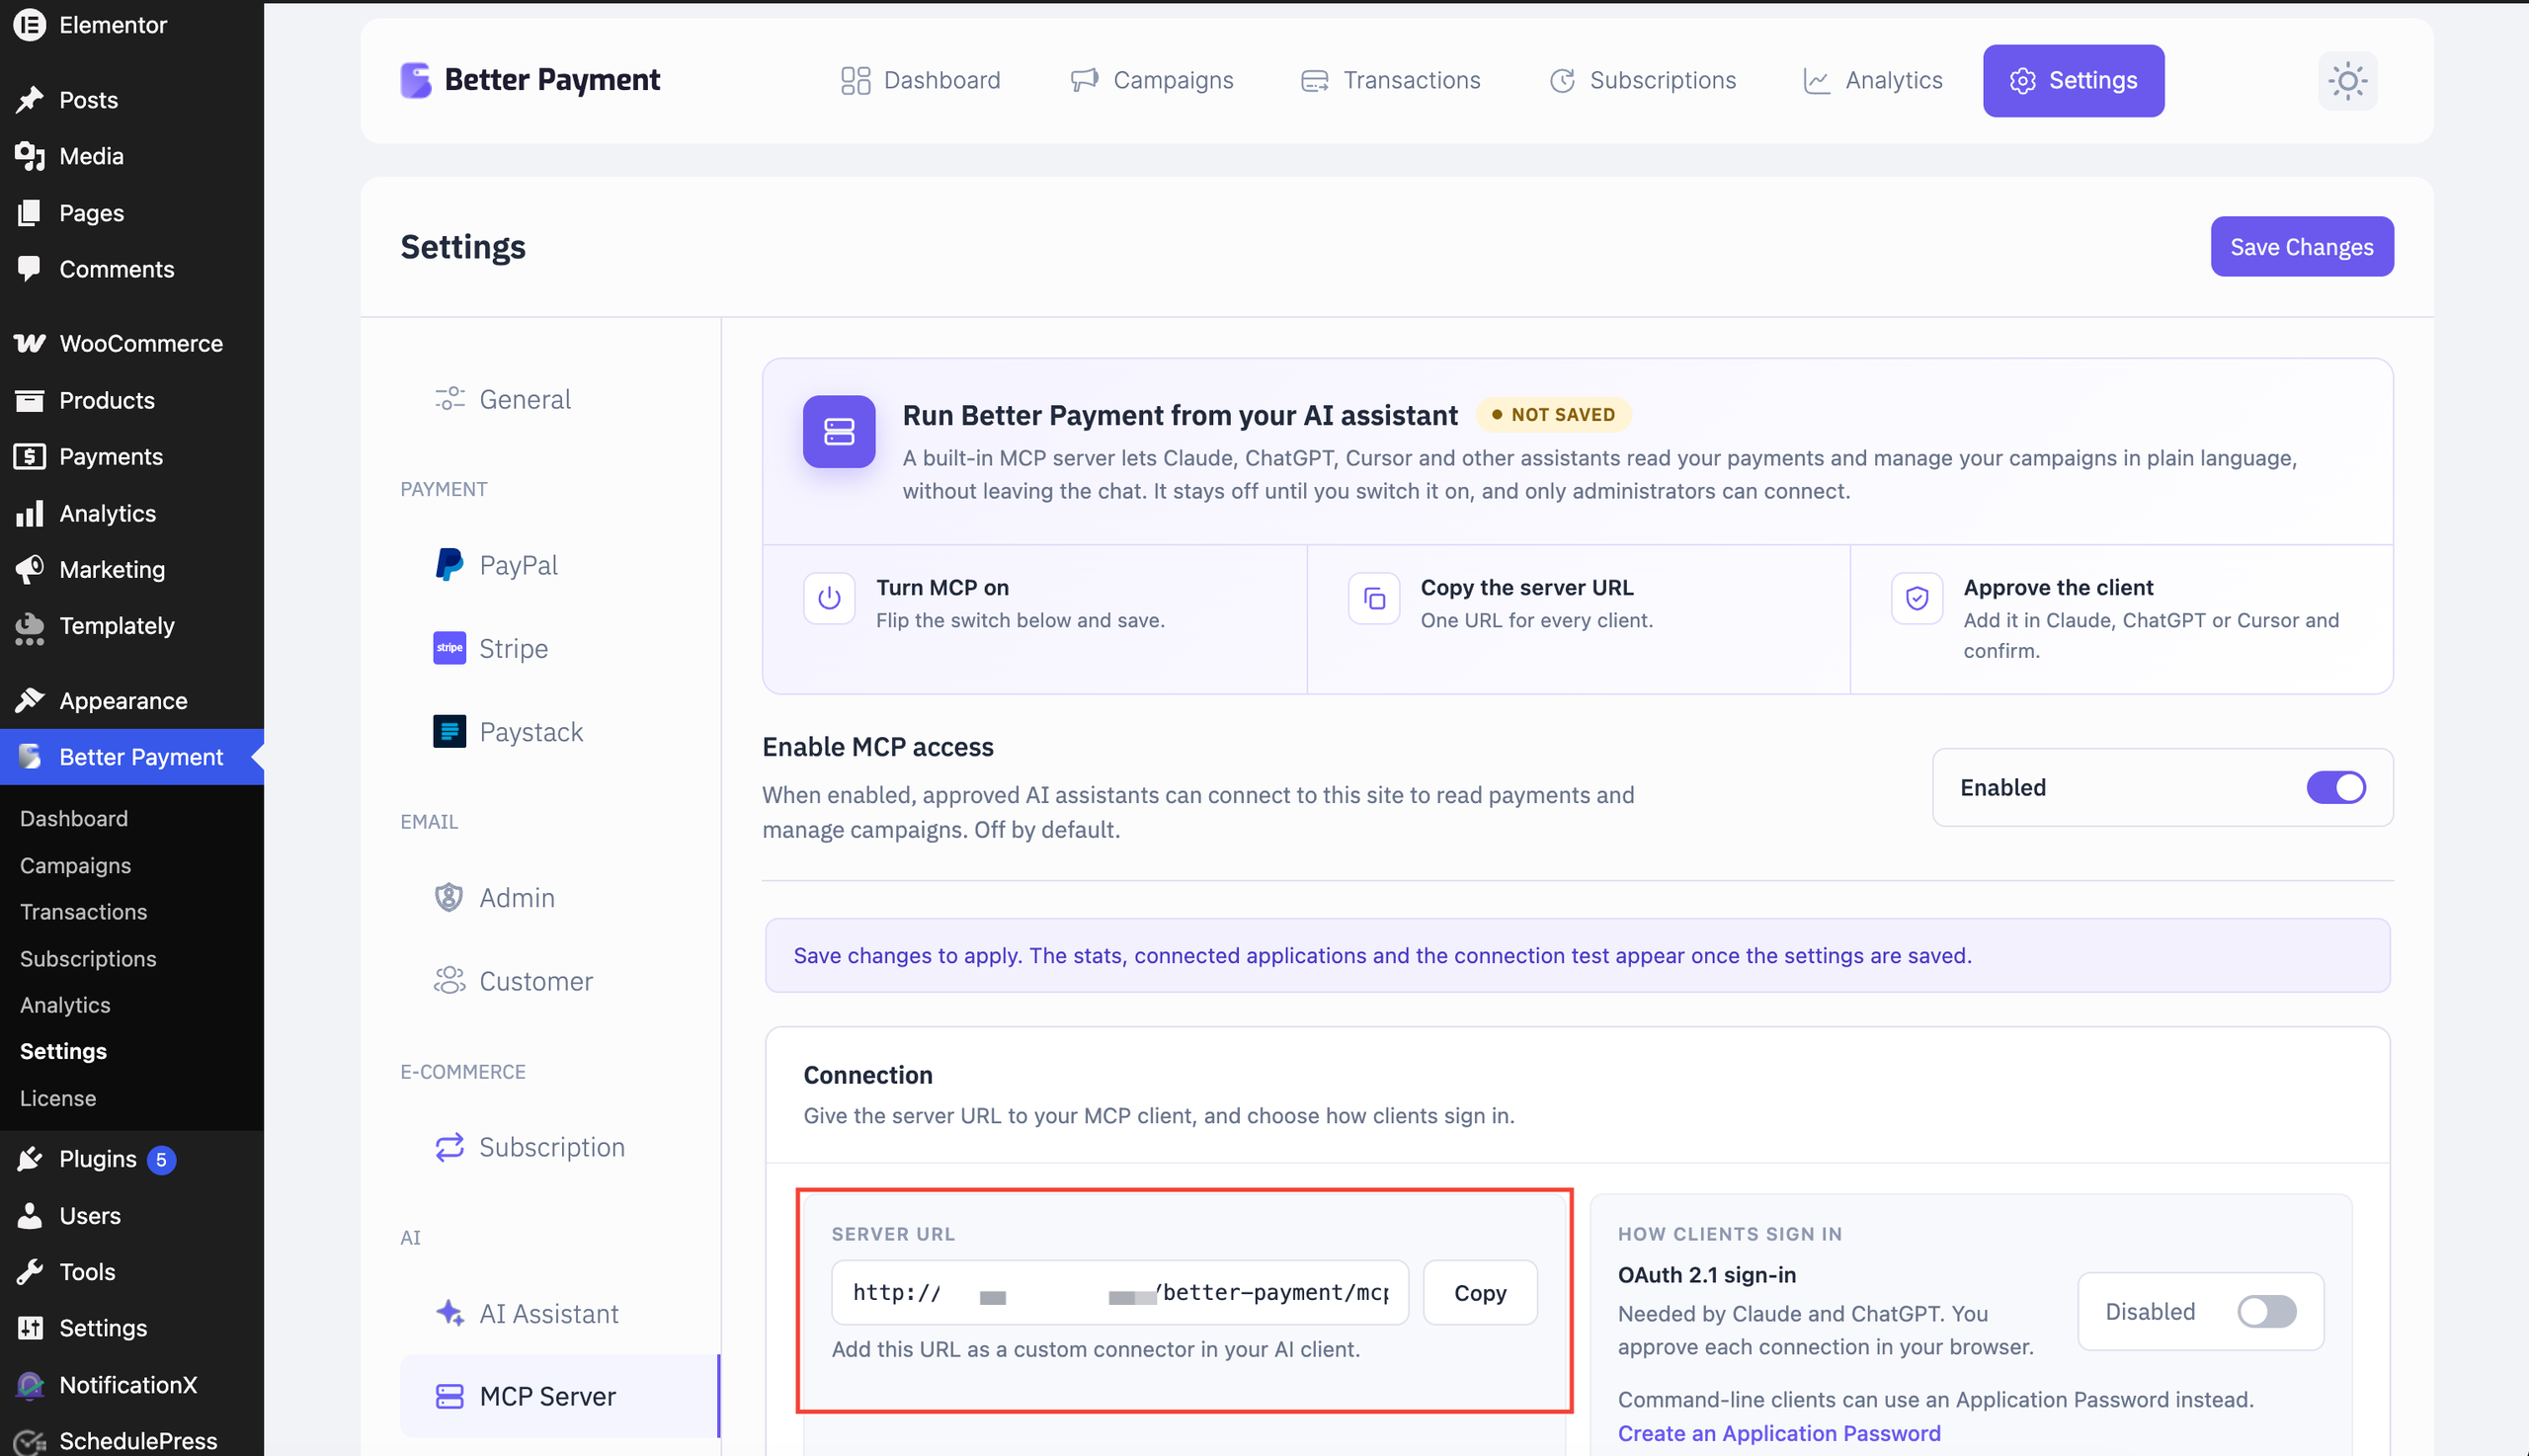
The Connection panel gives you everything a client needs.
Server URL. Under Server URL, click Copy. The URL looks like https://yoursite.com/better-payment/mcp. You will paste this same URL into every AI client you connect.
Pick the sign-in method that fits your client:
| Client | Sign-in method | What to do |
| Claude (web and desktop), ChatGPT | OAuth 2.1 sign-in | Turn on OAuth 2.1 sign-in and click Save Changes. You approve each connection in your browser. |
| Claude Code and other command-line clients | Application Password | Click Create an Application Password and use it in the client’s setup command. |
Ready-made client setups. Further down, the Connect a client panel has a tab for each client: Claude Code, Claude (web & desktop), ChatGPT, Cursor, VS Code, Windsurf and Any other MCP client. Pick your client and click Copy to get its setup command or configuration, already filled in with your server URL.
Step 4: Add Better Payment as A Custom Connector in Claude #
The steps below use Claude (web or desktop). For ChatGPT, Cursor, VS Code or Windsurf, use the matching tab in Connect a client (Step 3).
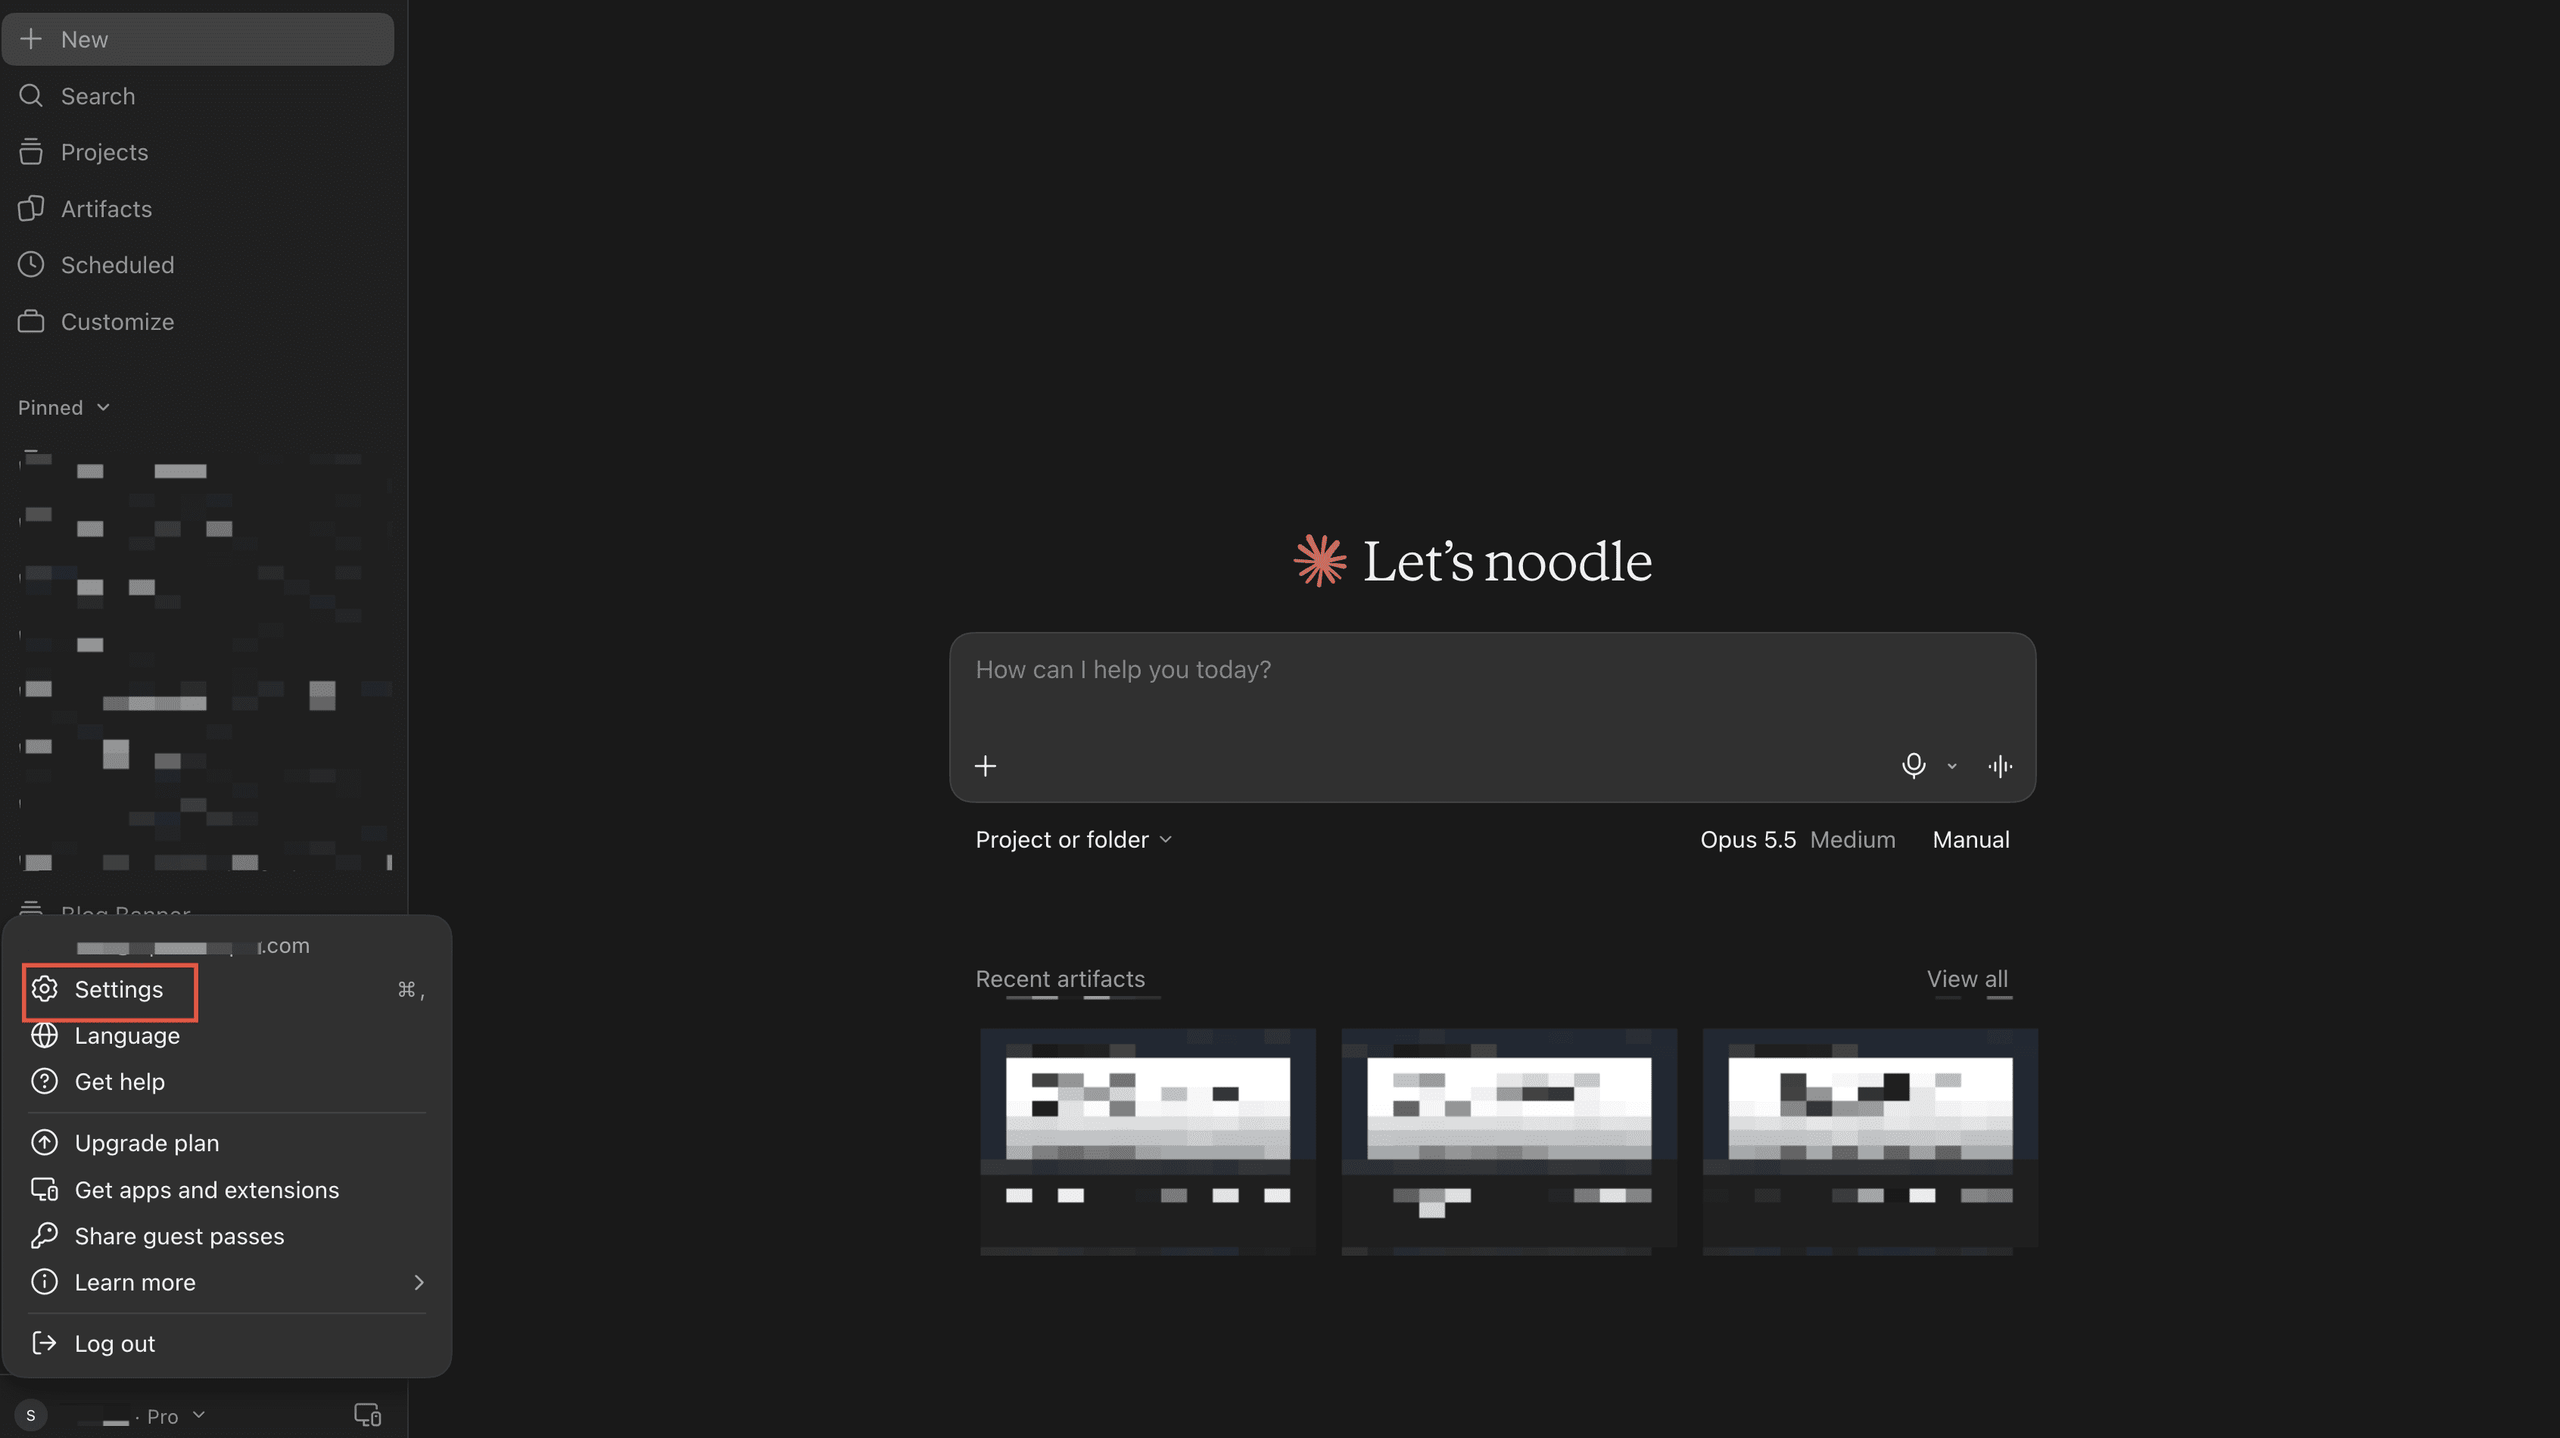
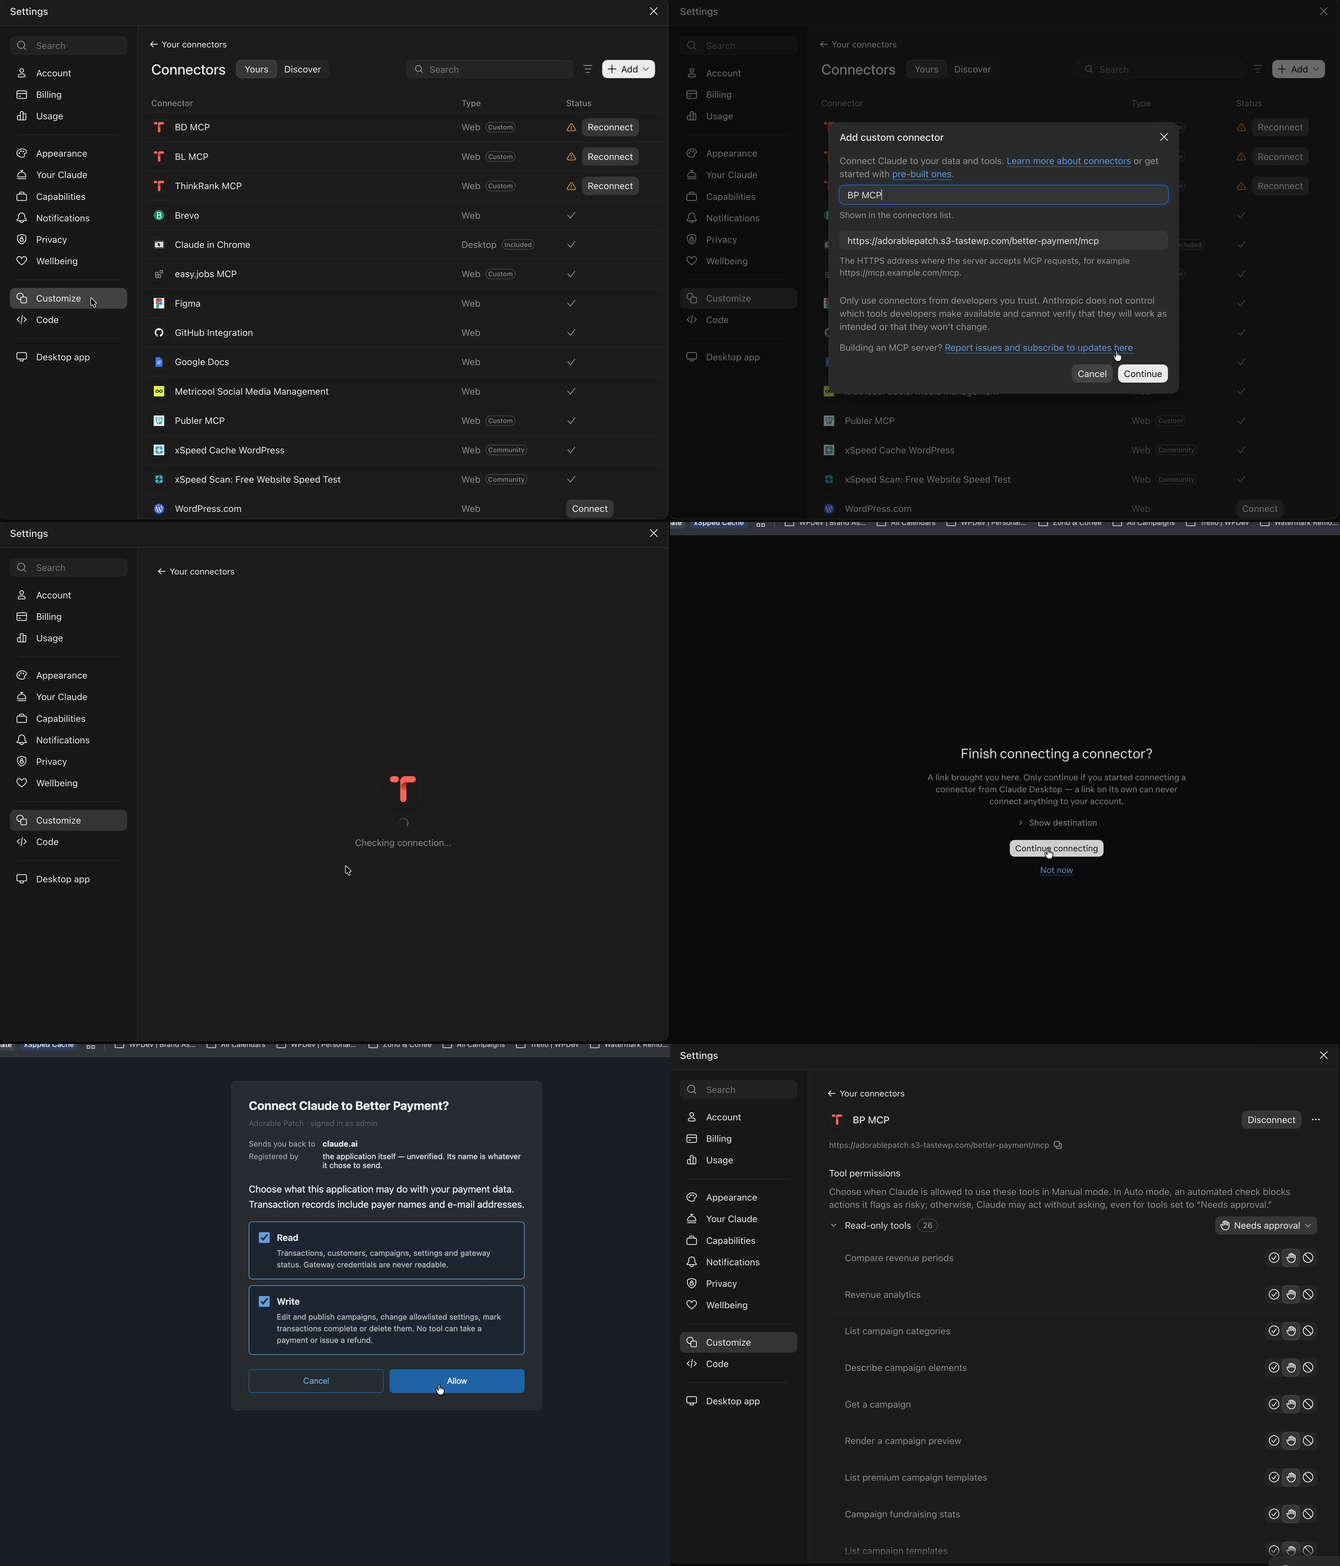
- In Claude, click your name in the bottom-left corner and choose Settings.
- Go to Customize → Connectors. Your existing connectors are listed under Yours.
- Click + Add in the top-right corner and choose Add custom connector.
- Enter a Name, for example, Better Payment or BP MCP. This is how the connector appears in your list.
- Paste your Server URL from Step 3 into the URL field and click Continue.
- Claude checks the server. It connects, looks up the sign-in settings and checks the sign-in provider.
- Under OAuth client, leave Register automatically selected (Claude marks it Detected). Leave the request headers empty and click Add.
Step 5: Approve the Connection #
- On the connector’s page, click Connect. If Claude asks Finish connecting a connector?, click Continue.
- Your site opens the Connect Claude to Better Payment? screen. It shows which site and admin account you are signed in as, and where you will be sent back to (claude.ai).
- Choose what Claude may do with your payment data:
- Read: transactions, customers, campaigns, settings and gateway status. Gateway credentials are never readable.
- Write: edit and publish campaigns, change allowlisted settings, and mark transactions complete or delete them.
- Click Allow.
You are sent back to Claude, and the connector shows as connected. On the connector’s page you can set Tool permissions for each tool: allow it always, ask for approval each time, or block it. Read-only tools default to Needs approval.
Tip: Leave Write unticked if you only want reports and lookups. No tool can take a payment or issue a refund, regardless of the permissions you grant.
Step 6: Check & Manage Your Connections in Better Payment #
Go back to Better Payment → Settings → MCP Server and scroll down.
Connected applications lists every client you approved on the sign-in screen. Each entry shows the client name, its access level (for example, Read & write), the admin who approved it and when it was last active. Click Refresh to pick up a client you just connected. Click Revoke to remove a single client’s access.
Connection health confirms that the setup is working:
- Secure connection (HTTPS) is on.
- OAuth discovery documents are published. Claude and ChatGPT need these to sign in.
- Endpoint: your server URL and the MCP protocol version it supports (for example MCP 2025-06-18).
Disconnect all revoked OAuth connections at once. Click Disconnect all clients if you think a client was connected by mistake. Each application has to be approved again afterwards.
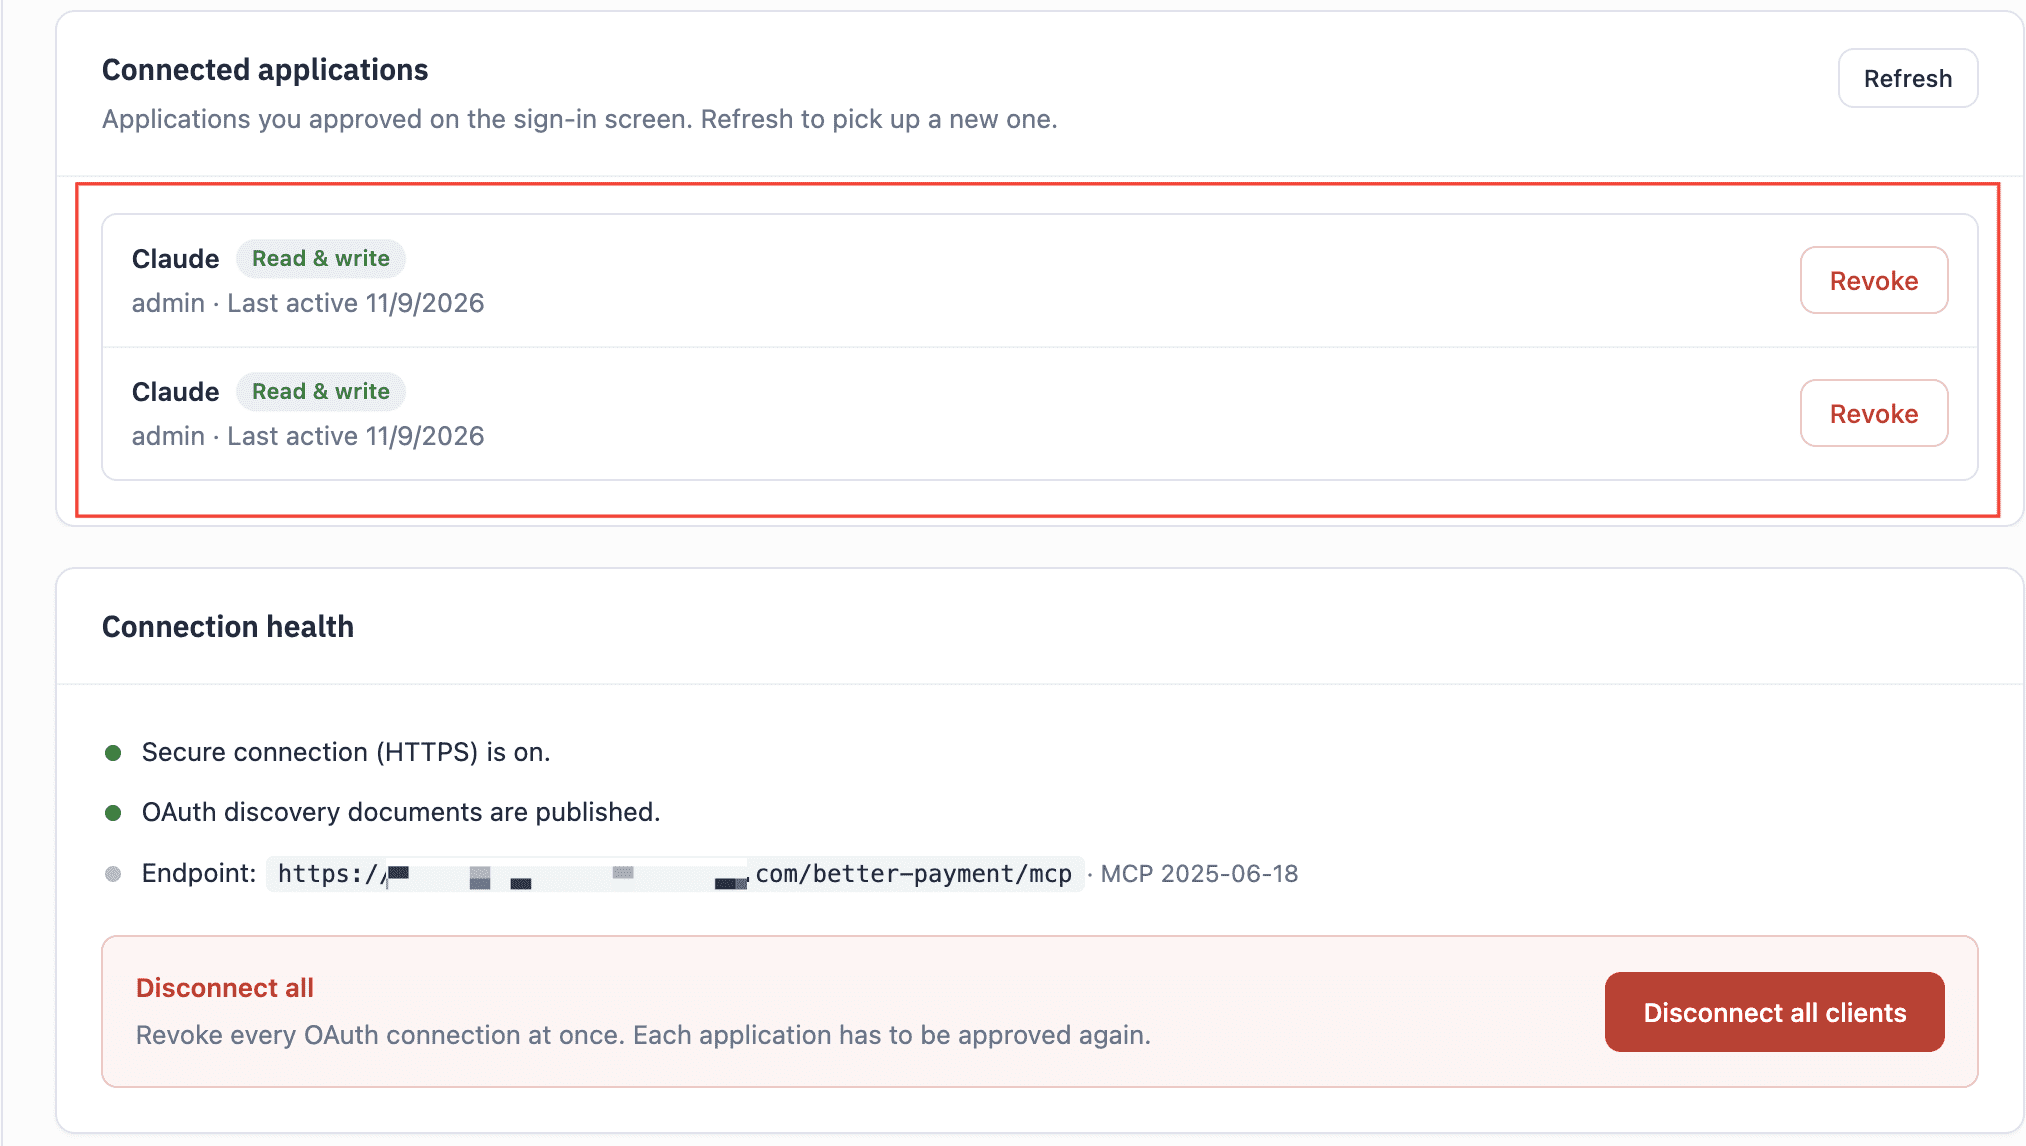
To turn the feature off entirely, switch Enable MCP access back to Disabled and click Save Changes.
What You Can Do with Better Payment MCP #
Once connected, just ask in plain language. Your assistant picks the right Better Payment tool for you.
| Area | What the assistant can do | Try asking |
| Site overview | Check the plugin version, Pro status, enabled gateways, active modules and site currency | “What’s set up on my Better Payment site?” |
| Transactions | List, search, count and export transactions; view one transaction; mark it complete; resend a receipt; delete a record | “Show me last week’s incomplete Stripe payments.” |
| Revenue analytics | Report totals for completed, incomplete, refunded and unpaid payments; compare recent revenue with earlier periods | “Compare revenue for the last 30 days with everything before.” |
| Customers | Look up one payer’s history and totals by email address | “How much has [email protected] paid in total?” |
| Fundraising campaigns | List, create, edit, preview, apply templates to, publish and unpublish campaigns; check amount raised, donors and goal progress | “Create a draft campaign called Winter Food Drive with a $5,000 goal.” |
| Subscriptions | List WooCommerce, FluentCart and SureCart subscriptions and their renewal orders; cancel a Stripe subscription | “Which subscriptions renewed this month?” |
| Settings | Read settings; update allowlisted settings such as feature toggles, currency and email templates | “Turn on the User Dashboard.” |
| Gateways and licence | Check whether PayPal, Stripe and Paystack are ready to take payments, in live or test mode; check the Pro licence status | “Is Stripe ready for live payments?” |
| Activity log | See which tools were called recently, by whom, and how each call ended | “What has the MCP connection done today?” |
Most tools that change data support a dry run. Ask your assistant to “do a dry run first” to see what would change before anything is saved.